Story
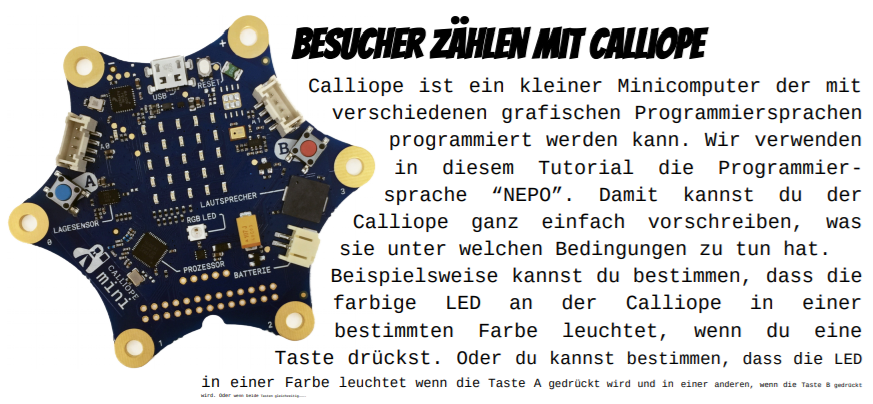
The calliope mini is a minicomputer that can be programmed with different graphical programming languages. In this tutorial we use the programming language NEPO popup: yes. With this language you can easily tell the mini what it has to do under which conditions.
For example, you can tell the colored LED on the mini to shines in a certain color when you push a button. Or you can choose to have the LED light up in one colour when button A is pressed and in another when button B is pressed. Or when both buttons are pressed at the same time...
You see, there are lots of possible inputs to which the mini can react and perform different actions based on them. Probably more than you would spontaneously think of...
In this tutorial you will learn how to give the mini instructions and how to define conditions for the application. You will also learn how to make the mini repeat an instruction, which is also called running a loop. Finally, you will also learn to use a variable whose value can change as the program progresses.
At the end of the tutorial you will have learned some basic elements of programming with NEPO. The great thing is that almost all programming languages work with the same basic elements. So if you want to continue working with another programming language later on you just take these basics with you.
The project
Your project seems to be quite manageable: You will program a digital visitor counter ( dvc ) for the mini. The dvc will always add one to an existing value, for example at the push of a button. The dvc has an older brother, the analogue visitor counter. Maybe you've met it before. They are used on various occasions, for example on a ferry to count how many people actually board the ship, in shopping malls to count how many people pass a store, when planning new roads or rail lines to count how many people take a train or drive down a street. The areas of application are many and varied. Can you think of other applications?
Because the project is not so easy at second glance, we will develop it in 5 steps.
In the first step you connect your mini with the help of a USB cable to your computer and open the page https://calliope.cc in the browser. There you open "Editor" which is located in the "Let's start" item on the page.
There are several editors available, we will work with the Open Roberta Lab popup: yes in this tutorial. There you have to choose which system you work with. For your project you need the calliope mini 2016 or 2017.
In the second step you will make the mini react to a button push.
The editor window already contains the start block. You can connect more blocks to it simply by dragging them from the menu on the left into the Editor window. The program always starts at the start block and runs from there through the instructions.
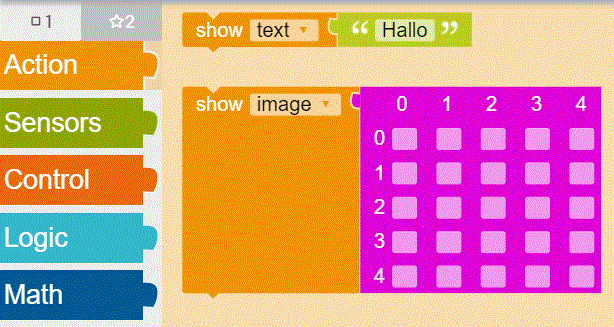
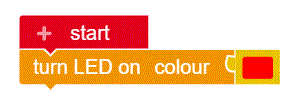
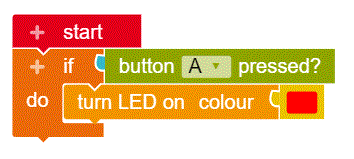
Start by inserting an instruction: Action: "turn LED on color red":
Download the program to your mini by clicking on the small play icon and then follow the instructions on the screen. Observe how the mini reacts...
Calliope should only react when a key has been pressed. So add a condition: "If button A pressed? do..."
Check again how the mini reacts.
The result is certainly not as you expected. But that doesn't matter at all! In fact, the program works correctly. The program starts immediately from the start block and checks whether the key A is pressed. If yes, it executes the instruction behind it.
NOTE: This is called an iterative procedure. Make a small change that should solve the current problem, and check what happens.
Either the problem is solved and we can look at the next problem or we're going to have to deal with a new problem or the original problem is not fixed jet and we have to retry fixing it.
Each individual run through a such improvement process is called an iteration. It’s a common procedure in software development and the reason, why patience is one of the most important virtues of a programmer.
Question
- Why doesn't the program work the way you want it to?
Try out what happens when you press and hold button A while restarting your Calliope mini.
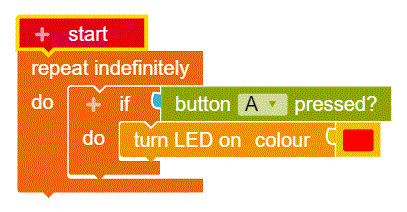
In order for the LED to light up as desired on keystroke, you need to use a loop that repeats the check again and again.
But even now the program doesn't work the way it should.
Question
- Why doesn't the LED go off when you release the A button?
In order for the LED to be switched off again you'll have to determine somewhere in the program code that it should happen. Try different places in the program and test how the mini reacts. Where do you think this instruction is best placed?
You have probably noticed that the LED starts to flicker when you press the A key. This is due to the fact that the loop is repeated over and over very quickly. As long as button A is pressed, the LED turns on once per cycle and turns off again immediately afterwards.
There is a way to make sure that the LED doesn't flicker anymore:
After switching on the LED you can set a time for the LED to light up. There is the "Wait ms" block at which you can specify,
for what time (in milliseconds - thousandths of a second) the program should pause. You can play with the timings until you have found a reasonable value where the LED no longer flickers, but the key is still works fast enough.
Question
- What is the problem with this solution?
A better option would be to use this block: 
This somewhat complicated nested switch tells the program to wait until key A is not pressed (anymore) . Try it out!
Boolean value
The computer works on a basic level only with the numbers 0 and 1, because a computer chip uses electrical signals to work.
0 means there is no current flowing, 1 means current is flowing.
When the computer checks whether a key is pressed, there only two possible answers, yes or no. (If the key is only half pressed - which is not as simple as you could think - then the button is just not enough or just enough pressed and the answer is still unique: Yes or No.) These values can then also be read as false (=0) or true (=1). So if the computer checks whether a key is pressed, it gives "true" as the answer or "false". In our case the program waits until the A key is not pressed (any longer).
Now at last it is time to write some short explanations in your program code to explain what happens in detail in the program.
For this there is the block under the heading "Text". Describe briefly what happens in the following program section.
The explanation should be short but understandable. It helps you and others to understand the program even after weeks, months or years. One of the most common beginner's mistakes in programming is not commenting your own program code sufficiently. This makes life unnecessarily difficult for yourself.

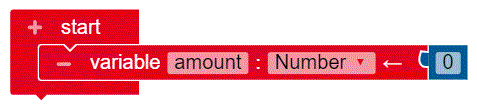
Give the variable a name. I have chosen the name Number, but you can also be a little more creative. It is clever to choose the name in a way, that the name already suggests what this variable is used for in the program. Otherwise the program will become unnecessarily confusing later. The name should not contain any spaces or special characters. The variable simply contains a number and we give it the starting value 0.
The thing with the variables
Variables may look a bit confusing in the beginning. But in fact they are very convenient. You tell the program to work with the number "Number of today's guests" independently of the actual number of guests. A variable is simply a container which you can name and store values (e.g. numbers, characters or even sentences) in.
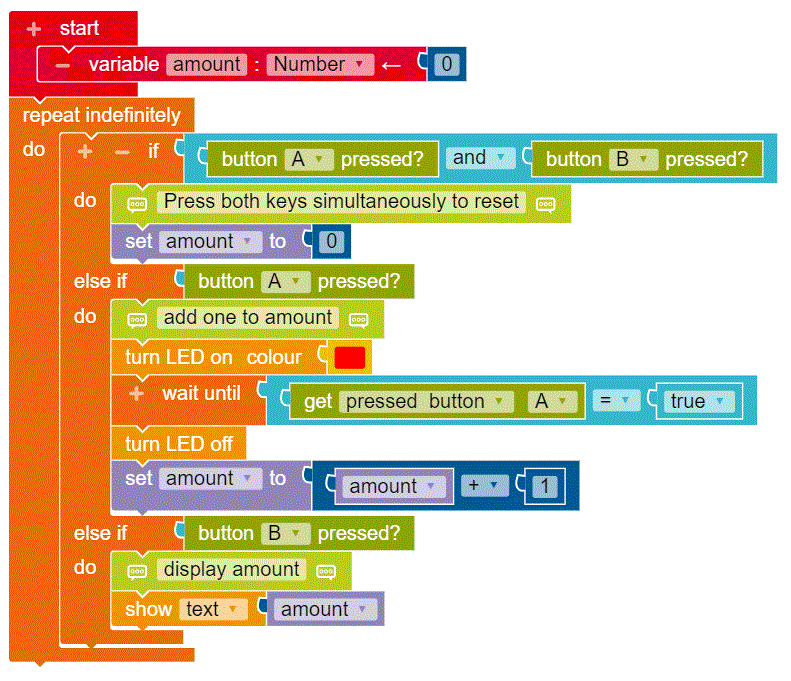
Now we have to make the program increase the value of the variable by 1 each time the button is pressed. Therefore we combine program blocks from the categories "Variables" and "Math".
The LED can light up further on.

In the fourth step you add the possibility to display the value of the variable. For this we use the button B and build a further step into the examination.
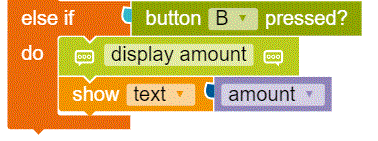
So the mini first checks if the button A is pressed during each program run and executes the instructions in the corresponding block if necessary and starts a further run of the loop. If button A is not pressed, the mini checks if button B is pressed and executes the corresponding instructions if necessary before it starts the next run through the loop.
Question
- Why is it necessary to check whether both buttons are pressed at the beginning of the decision?
Testing
Great! Your program is now fully functional! You have created a working visitor counter! Now it is time to test it extensively in all possible situations. Maybe you notice another situation where the mini doesn't work as expected, then you have to go back to the computer and fix the problem.
Besides, you have learned what an instruction is, how to make different instructions dependent on decisions or conditions and how to run through individual program parts again and again with the help of a loop. Finally, you have also learned a lot about the use of variables. With these basic elements you can already do a lot because all programs are based on a nested combination of these basic elements.
This text as well as the images are published under a CC BY-SA 3.0 DE license popup: yes. It was originally published in German popup: yes by Konstantin Kowalski and translated into English by the Calliope team.