We're developing a temperature gauge.
- First enter lab.open-roberta.org popup: yes into your browser and select Calliope (2017) as your system. → There you can program.
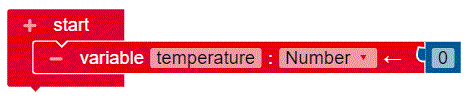
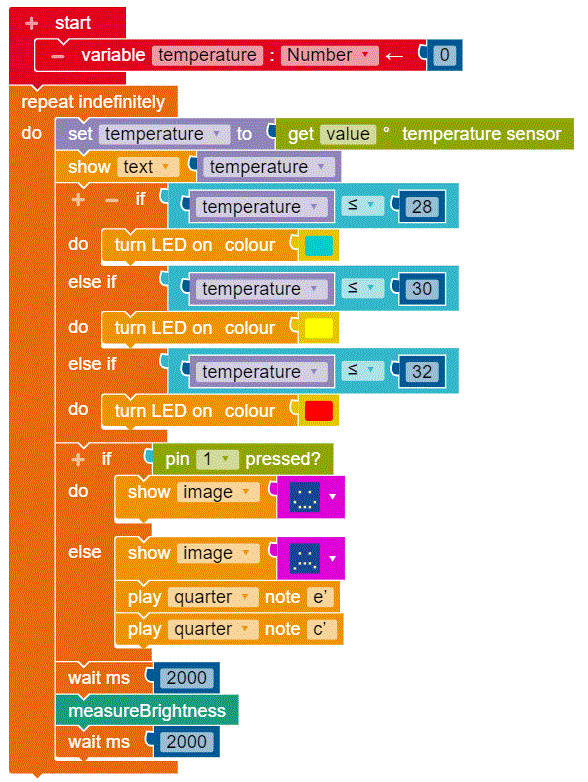
Step 1: Create a variable for the temperature.
You can create the variable by clicking on the small plus (+) next to start.
- Name your variable "temperature".
- Since we do not know the temperature yet, we simply enter the value 0 for the time being.
Your start block should now look like this:
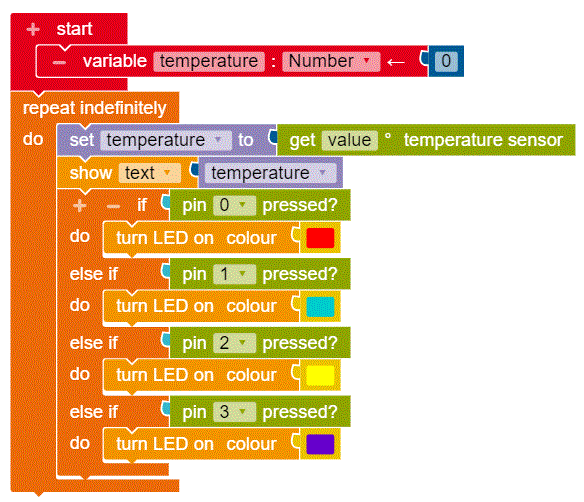
Step 2: Read out the temperature sensor
- Find the right block to measure the temperature. Write the measured temperature in your variable and output it with a "show text" block.
If you have done everything right, your result should look like this:

Note: The temperature sensor of the Calliope mini is not accurate and influenced by exhaust heat. Only an approximate value is given and it can happen that two calliopes in the same room show different values.
Info
Using variables, the Calliope mini can remember things. In our case, the Calliope mini remembers the temperature. When the temperature changes, the value of the variable also changes. The temperature is measured with the temperature sensor.
Now color comes into play: Depending on which PIN is pressed, the RGB LED should light up in a different color.
- Add a "If do" block under the last "show text" block.
- If pin 0 is pressed, turn on the LED and select any color.
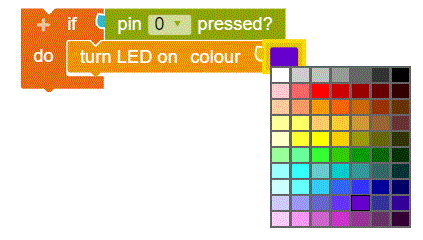
Here is a possible solution:
Info
The pins are not buttons like button A or button B, but can be used in a similar way. For example, to press or activate pin 0, you must simultaneously touch the minus pin with one finger and pin 0 with another finger.
Next task
Now adjust your program so that the color of the LED is controlled by the current temperature and not by the PINs. Try it yourself before you continue reading.
We control the color of the LED via the temperature (and not via the PINs).
- Instead of pin blocks you now need logical comparisons in which you stake out temperature ranges.
- If it is cold to warm, the LED should light up blue.
- If it is very warm, the LED should glow yellow.
- If it is hot, the LED should light red.
- We have created temperature ranges up to 28 degrees, 30 degrees and 32 degrees. Depending on how warm it is at your place, you have to adjust the values accordingly. The ranges should be relatively close to each other, so that you can quickly detect temperature fluctuations.
"If" the temperature is less than or equal to 28 degrees, then the LED should light blue.
"else if" the temperature is less than or equal to 30 degrees, the LED should be yellow, etc.

Next task
Now we extend the program by a moisture meter, which can inform you e.g. if your plants have too little water. For this you need clip connectors. Try it yourself before you continue reading.
We extend the program with a moisture meter that can tell you, for example, when your plant should be watered.
- You need a "if do else" block.
- If pin 1 is pressed, then display a laughing smiley, otherwise display a sad smiley and play two quarter notes.
- At the end, add a wait block of 2000 ms (2 sec).
- Test your program:
- Connect the first clip connector to the negative pin and a conductive object (e.g. banana, apple or fork).
- Connect the second clip connector to pin 1 and the same conductive object.

Info
So that the calliope warns you when your plant should be watered, you can, for example, put two spoons in a flower pot and then connect a clip connector with one spoon and the negative pin and another clip connector with pin 1 and the other spoon. If the soil is damp, it will conduct, otherwise not. If the soil no longer conducts, there is a danger that your plant will dry out. Your flower will contact you if it has too little water.
Next task
Now we extend the program by a brightness meter, which can inform you e.g. if your plant gets too little light. Do you have an idea for a possible solution? There are several possibilities. Try it yourself before you continue reading.
We extend the program by a brightness meter. (One possible solution)
- Write your own function (extended editor, in the upper left corner) and name the function "BrightnessMeasure".
- Depending on the brightness, the light sensor returns a value between 0 and 100.
- As with the temperature, we can now define brightness range.
- Depending on the brightness, we fill one to five lines of the LED display.
- Important: The function must be started!

Expand your flower care station now.
At the end of the lesson you can show what you have done to the others in your class.
You could, for example:
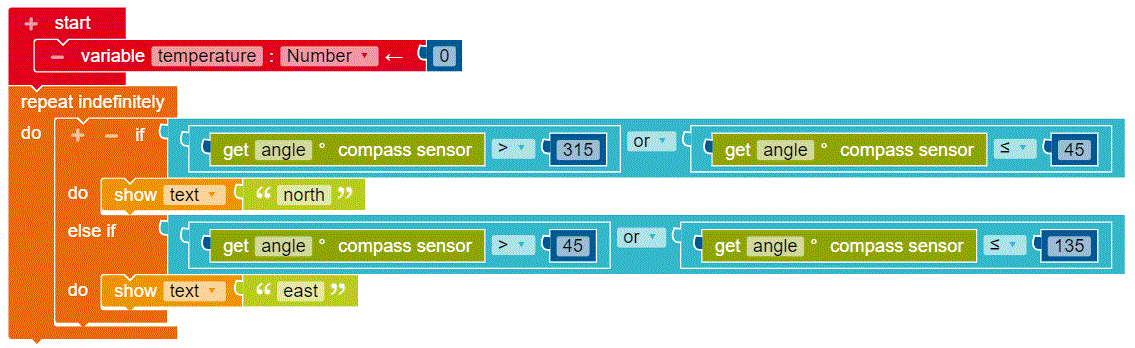
- Use the compass to find the right location for your plant by using the compass. (For example, it is best to place a cactus in the south, because it needs a lot of sun.) A small example of this....
- Radio the signal when your plant needs to be watered to other Calliope devices.
- Do you have any other ideas? Great, then you can try it out.
Note
If you play the program on your Calliope, the compass has to be calibrated first.
This text as well as the image is published under a CC BY-NC-SA DE license popup: yes. It was originally published in German popup: yes by appcamps popup: yes and translated into English by the Calliope team.